Thursday, January 31, 2013

Talking Shop, Letting Go and Trimming a Lampshade

Dear Readers,

I'm at my parent's house in Arizona. And I always get a little wordy with my posts when I'm out here in the country. All this fresh air clears my head, I think. :)

I've been keeping up this site for a long time - going on six whole years! (how did that happen?!) I've been a blog reader for even longer, and by now, I've learned a bit as both a producer and a consumer of creative sites. It feels like there's a change in the wind lately, doesn't it?

All of us content-producers that work for ourselves, we're all trying to figure out our place in this fast-paced, idea-sharing world - with its Pinterests and Tumblrs and Instagrams (and now Vines!). I know it's weird to be on the content-consumer end of things right now as well. Blogging is such a new, and kind of weird media. Martha Stewart Living Omnimedia, we are not (which I think is part of the charm and allure of blogging). As we all know, most of the time, blogs are run by one person, out of their home, who happens to have a passion, who wants to share it, and who hopes to eventually make a fair wage for their labors. We're still trying to figure out the money bit. What's appropriate when we genuinely feel that our readers are our friends, and when we're often talking about deeply personal things? You readers are front and center as we muddle through all of this and more: sponsorship opportunities, attending and feeling the need to report on conferences about blogging, then also dealing with difficult "real life" situations as well as just the small-scale highs and lows of everyday life. And then of course (!), producing content all the while.

I've tried to be better about this in recent years, but back in the day I felt like I had to have a project *done* before I shared it here. It wasn't like that in the very beginning though. When I first started blogging, I was openly sharing everything I had on my mind - big and small. When no one's reading your site (and with no mean-spirited comments occasionally coming in) there's nothing to be self-conscious of. When I started getting more traffic (and some of those less-fun comments), I noticed myself holding back a little more. Also, some of the real joy of sharing was starting to leave, which is a bummer for me to think about.

Well, I've decided to let go a little, to get back to basics. And I'm determined to reclaim some of that lost joy, especially now that my interiors business is doing well and other media opportunities are opening up to me. I know now that I'm not blogging as a means to an end. It's the blogging itself that I think I love the most. So, how to make that more sustainable and more fun?

As a blog reader, I know that I love getting to know the writer behind the blog as much as I love their great content. I love the small projects just as much as (sometimes even more than) the grandiose room reveals. I like feeling like I'm along for the ride as the blogger lets me get inside his/her head. This is where bloggers can differentiate themselves from the other social media outlets. We can dig deeper into the story. We can share more. 

And what's the point if we're not? Might as well stick with Instagram.

I know this is a rather wordy, out-of-left-field post, and I don't mean to pull back the curtain in an unsavory way. And I don't write it to make any sort of announcements about the future of this site. But, as my site redesign and url change (!!!) are finally reaching completion (and after several lengthy, late-night conversations with other bloggers at Alt), I've come to the realization that if I want to keep going with LGN, I need to be willing to share more. All with less worry for what other people think of my projects and my style, because that is the whole point. I named this site Little Green Notebook after an idea journal I used to keep in my bag (before the days of iPhones) that would record all my notes to self. Project ideas with sketches, shopping lists, clothes and shoes to save up for, stores to look up online, dreams and goals. So, all that to say, I hope you keep joining me here during the week as I get back to sharing more of these things again. I love, love, love having you. I imagine you all as my girlfriends that I feel comfortable enough to have over even when my house is a bit messy. Thanks for being so chill, thoughtful, respectful and cool to me as I put my ideas and my personal life out there. :)

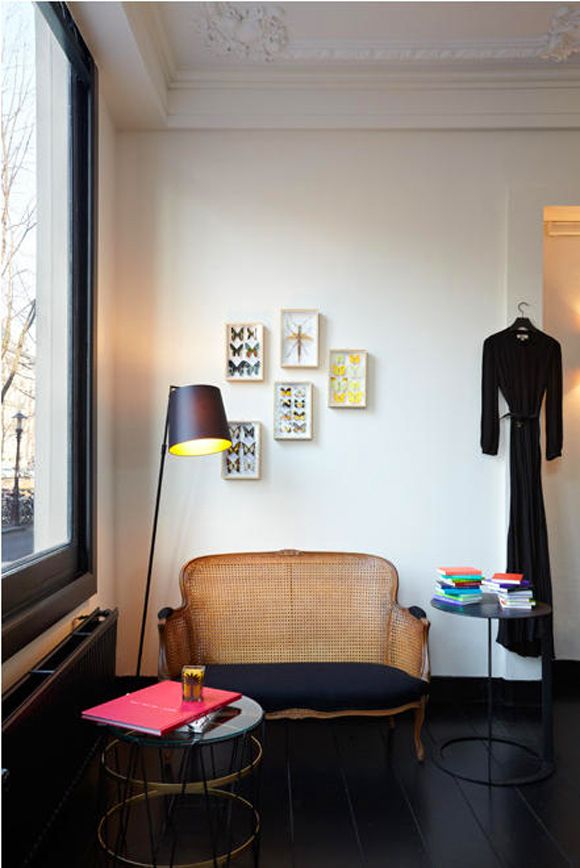
I did this little project last week. As I snapped the photos I thought, no one is going to care about a piece of ribbon on a lampshade in an unfinished room. But those sound like the worries of Old Jenny, don't they? And New Jenny digs simple, achievable projects and shares. So, onward with the post!


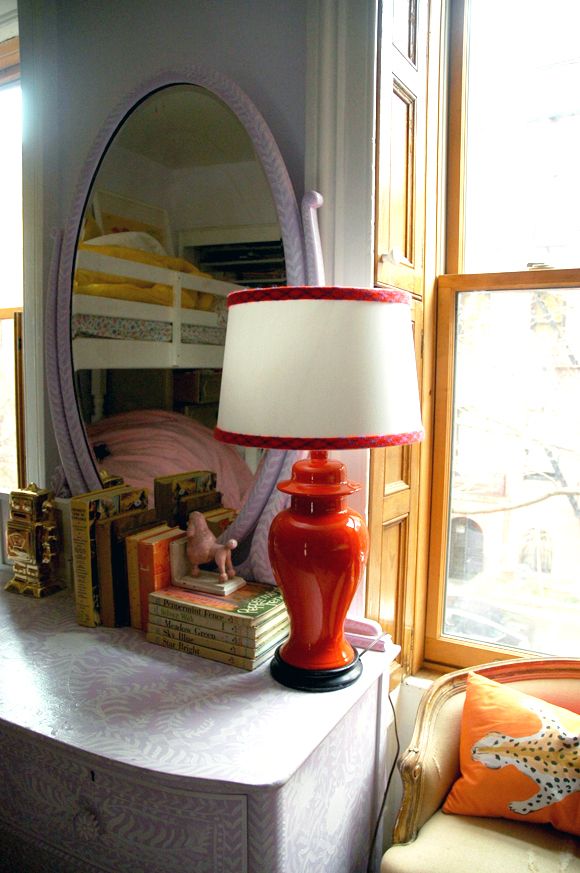
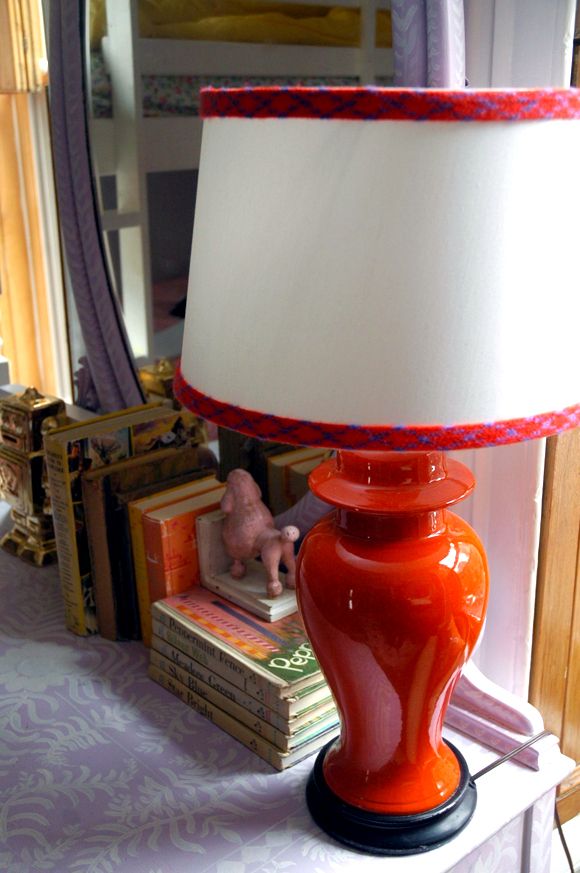
Before I went to Alt, I was changing the girls' sheets, dreaming/lamenting about how much I want to do to their room this year (like new bedding - stat!). In the spirit of making small, but impactful changes, I decided there needed to be more red in the room. I ran down to the lamp graveyard (as Michael calls it) in the basement and grabbed this tomato red ginger jar lamp (seen here previously). I wish I had a black paper shade on hand, but this cheapy white one from Target worked too. (It is so hard to pass up those dang uno shades at Target. They are SO inexpensive and accessible! I just wish they would make more shades that work with harps. Same with IKEA's shades).

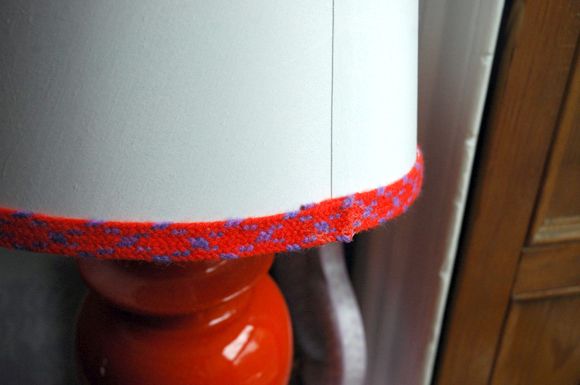
Table lamps in kids rooms can look a little stuffy, you know? So one of my favorite tricks is to glue colorful trim to the top and bottom lips of the shade. Instant whimsy! (...I hate myself a little bit for saying that word). Like with almost every textile project I do, I used MagnaTac here (but Fabritac works equally well). Also, I used to recommend grosgrain for trimming out shades, but I think something with more stretch and give works best with shades that have any kind of sloped sides. This orange and violet vintage woven trim I picked up from SAS in Phoenix worked perfectly. Just roll under and glue the last inch where the ends meet to prevent fraying.


Five minutes of gluing later, I had some tangy, bright persimmon red in the room, and I felt better about the space. And (to bring it all back home) isn't that what it's all about? Small and simple steps. :)


Thanks again for sticking around, friends. Here's to six more years of DIY adventures on this little piece of the interwebs.
xo, Jenny

Tuesday, January 29, 2013

More Framed (Faux) Butterflies

I'm still in love with framed butterfly collections. Some of you were creeped out by the idea (and I suggested this paper cuts version), but I still like something a little more real-looking.


Recently I was at Michael's picking up some frames for a project and I spied a whole section of faux butterflies that were actually quite pretty! I think a framed collection of these would be adorable in any room, but especially in a nursery or a play room.


Not the real deal, but still pretty, right? Before any coupons, they were priced at about $1-$2 each, which is a steal.

And why not try a unique arrangement pattern (like with these) to mix things up a little?

Monday, January 28, 2013

Organizing Books by Color AND by Genre

We love books and have a little bit of a book-buying problem in the Komenda family. It goes without saying that it doesn't cut it for us to organize our books only by color - that way it would be impossible to find a specific book! And anyway, I think it can look a little forced when huge amounts of books are strictly placed in severe blocks of graduated color. You know what I mean? So while I appreciated the strict by-genre organization in the bookshelf wall in our loft, with our new bookshelf wall in the brownstone, this time front and center in our living room, I decided to experiment with the organization a little.

I've decided I have found the perfect-for-me way to organize books - and it is so, so simple. Here are the steps:


1) Decide where you want the biggest, chunkiest books to sit on your shelves.

My biggest books are art and design books and a couple of atlases and an old family set of encyclopedias. I went with most of these flanking either side of the fireplace. The atlases and encyclopedias went up on the highest shelves, since they are rarely looked at. (Except for one giant atlas that we keep on the coffee table.)

2) Before shelving anything, make piles of your books by genre.

We wanted our genre sections to be pretty specific so we could easily locate a book. We had to go past the fiction/non-fiction route. Our genre piles went like this: Classic Fiction, Contemporary Fiction, Art/Design, Religion, Lifestyle (cooking, hobby, crafting, gardening), Economics, Philosophy, Politics, Law.
1 - Contemporary Fiction  //  2 - Art and Design  //  3 - Lifestyle  //  4 - Religion

3) Organize the individual genre piles by color and while shelving, pay attention to size.

When you're dealing with a large number of books in one place, you can give the eye a chance to rest when there are blocks of just a few colors.  So it became rare for a single shelf to see the full ROYGBIV spectrum - most of the time each shelf was only two or three main colors. And I tried to be loose about the colors. I cared a little more about matching sizes than color shades, and I think that helps the overall look feel a little less uptight. If I had been really strict about keeping the colors in the exact right spot, the spine lengths would have been all over the place, which looks sloppy to me. Also, by being a little flexible with color, I could easily alternate the piles between horizontal widths and vertical stacks.

5 - Classics Fiction  //  6 - Political  //  7 - Design and Travel  //  8 - Economics and Philosophy  //  9 - Law

And that's it! I am so sold on these simple steps to artfully and functionally organize bookshelves. I've tried the tricks on two more bookshelves since doing my own, and I've been just as satisfied with the results. Isn't it the best when form and function work together?

Saturday, January 26, 2013

Happy Weekend

Hi friends! I didn't mean to drop off so early this week, so sorry for the slim posting schedule! I was a speaker at Alt Design Summit again (yay!) and I've been sick as a dog all the while, so a little blog break was in order. Also, in the sad news department, we lost my sweet Grandpa yesterday so I'll be traveling to Arizona for his funeral basically right after I get back to New York. So many highs and lows recently! Thank goodness for all the fun distractions I've had here at Alt. It really was so great to see blogging friends - what a bright spot in this sad, strange, dayquil-filled week. :)


One of the things I love about coming to Alt each year is having time away from the daily grind, where I can reflect on my blog and business and make some concrete plans. I really want to get some more momentum going with a fabric line this year. (You guys. On Wednesday, I got to pick Annie Selke's brain all night about this over dinner. It was amazing - and she is a true genius.). I've got all sorts of ideas for patterns, but wouldn't something like this pattern from the jeans I wore today at Alt be perfect? I want a floral that feels less stuffy, more modern. It almost looks decoupage.


{And the neon heels are from J Crew.}

I miss you all! I'm excited to get back to regular posting and regular life on Monday. Have a lovely weekend. xo

Tuesday, January 22, 2013

Reader DIY: Mongolian Lamb Stool

I love the look of benches, stools and chairs upholstered in fluffy sheepskin. They look really great as small accent pieces in a living room or a bedroom.


Erin Gates via the Everygirl

via Flickr


Reader Nadia used the simplest IKEA stool and a Mongolian lambskin pillow cover (this one would work really well!) to make a gorgeous little stool for her home.


I love the pink legs of her IKEA stool (and how about that wallpaper?)! For the full, very easy how-to, check out Nadia's post here.


If you have a project you'd like to share on LGN, please email me here. Thanks!

Monday, January 21, 2013

Powder Bath Updates

I have been looking for a new mirror for our powder bath for a while (you can see the super boring, plastic(!) old mirror here). The corner sink is so teeny that the dimensions of the new mirror needed to be pretty specific, and the frame had to be thin. It's hard to find a thin and interesting frame!

I found this antique beauty at Center Stage antiques in New Jersey (a fun place to stop by for furniture and mirrors if you're in the area) and it spurred a very spontaneous change of wall color.  Remember the DIY abstract walls here? I still liked the walls (they were really fun in person), but this mirror needed a more moody backdrop.


The new color is one of my stand-by favorites - Benjamin Moore's Chelsea Gray. It's dark, but not too dark.


And rather than going for a skirt on the sink like I thought I would, I just put a new coat of paint on the pipes so they sort of blend into the wall more. I love how industrial (and clean!) it looks compared to before.


I kept the bi-fold doors white for now for some lightness in the space. That old mother of pearl and brass light switch cover from Anthropologie came alive on the dark gray walls! It's been one of my favorites over the years. I think we've had this cover in five homes now?


I kept the old art hanging in the same places. These are all paintings (most of them really old) of my favorite places. I bought most of them in flea markets of the places they depict (Venice, Rome, Brussels, Bruges, and of course the Seaport etching.)


Most of them are unframed and a little ragged, but I think I like them best this way!


How was your weekend? Did you watch the inauguration?

Friday, January 18, 2013

For Sale: West Elm Headboard

*UPDATE: The headboard's found a home. Thanks for your interest! xx

This is so random, but I bought this huge, king-sized West Elm Scroll headboard for a client a while back and it won't fit in her pre-war apartment's front door (whoops!), so we went with a different, smaller option. I would normally just put the headboard in my "storage unit" (aka our basement), but it won't fit down the stairs. Did I mention it's huge? It is.


Just thought maybe one of you with more generously proportioned entries/bedrooms/storage units might be interested in taking it off my hands? It's a very pretty mushroom, taupe-y gray velvet, no nailhead, wrapped in it's original plastic from West Elm (never unpacked) and has been sitting in my office for weeks. I'm ready to off-load it asap. I bought it on sale and would happily entertain any offer (via email, please) to just get it out of here. (Pick up's in Brooklyn Heights) Thanks!


Oh, and happy weekend!!

Thursday, January 17, 2013

Recently on Fab!

Well, 2013 is moving along a break-neck speed already, isn't it? Fab invited me to share my picks for Valentine's gifts this year. Since we have my birthday, Christmas and our wedding anniversary that all happen within a couple weeks of each other, by the time Valentine's rolls around for us, we're tapped out of gift ideas (and are sick of spending money). So we usually exchange small and simple gifts. It makes the holiday light and fun, and I think all of these below fit into that category perfectly:


One  -  What better way to celebrate the day of love than going to dinner with your man while he's sporting a pink bowtie?
Two  -  I have a major thing for artglass vases in pretty color combos. They make perfect little vignettes.
Three  -  I recently found a vintage serape for our bedroom makeover. The color combos are so fresh to me!
Four  -  Special chairs for a special space.
Five  -  I'm completely crazy over this photography print of Diane-Freaking-Keaton laying on the sidewalk(!). So weird and so cool.
Six  -  Everywhere I look I see swans (and foxes, and owls still,  actually. But swans are my favorite of the bunch. Such graceful creatures!) 


Seven  -  This would be a great rug for a Stair Runner project.
Eight  -  How amazing is this collection of Italian flatware in almost every color you could imagine?!
Nine  -  When I was young, my mom had the prettiest amethyst ring that I loved to try on sneakily. I'm sure my kids would do the same with this amethyst ring.
Ten  -  Wouldn't these orange stripes look awesome on my green sofa?
Eleven  -  Scallops are super-trending. These pillows are a fun way to participate with out a big commitment  The tone on tone is so pretty and subtle!
Twelve  -  I just love delicate beading on necklaces.
Thirteen  - An easy-to-carry slate cheeseboard. I almost just wrote "for when it's time to take the Valentine's party to the bedroom" but that felt weird. I mean, good for you though if you're eating cheese in bed on the 14th. :)

Wednesday, January 16, 2013

A Bigger Mirror?

While I really love the vintage scrolly mirror, I'm feeling the dimensions are not right for above the sofa in our living room (formally the fireplace nook). I was thinking something a tad bit wider, and about a foot taller. And I wanted something with an interesting frame - super modern? or carved and crusty with age? All of that sounded good to me.


The issue is really large antique mirrors cost (often) thousands, so I've had a hard time finding something in the right dimensions that is also reasonably affordable. I found this mirror (supposedly from India?) on Craigslist for only $150. It's huge, at 60"x48" - much closer to the ideal dimensions.


I did end up buying last night and it was so cool to see the seller's apartment - he lived in this amazing old luxury building in Washington Heights. And get this - he had never lived in another apartment his entire life! His parents moved into it rent-controlled and passed the lease on to him and his wife. Can you imagine paying practically nothing for a huge apartment? They had really amazing furniture that had this well-traveled vibe. Loved it all.

So, now I am on the fence about maybe painting or even gilding the mirror. I like the gold element that the scrolly mirror brought to the room, but this frame might be too heavy for an all-gold look. I thought a matte mid-tone gray would be pretty too - like a milk paint? And truthfully, after bringing the mirror inside today, I don't mind the wood finish left as is. I need to switch the wire around so it can be hung vertically and then I'll take a photo to share in the space. (keep an eye out for it on instagram - @jennykomenda)

What's your vote? Paint? Gold leaf? Keep it as is?

PS My heart's set on putting the scrolly mirror in another room, so I'm really hoping I can make this new carved mirror work in the living room. :)

Tuesday, January 15, 2013

How to Strip Vintage Furniture

I picked up this vintage Parsons console at the flea market a while back and I've been meaning to redo it for ages. Well, I finally was able to cross the project off my house to-do list! I'm loving the bright acid yellow enamel in our living room. It looks pretty with the new sofa color.


The old finish was not all too offensive from afar (this is why the table was not higher up on the to do list). Pretty neutral here, right?


But up close! BAD CRACKLE! NOOOooooooooooo!


Here's the run down on how I stripped off at least 11 layers of paint and even some thoughts on painting with oil-based paints for that lacquered, enameled look.

I've used Klean-Strip Stripper and Citristrip before with great results. I happened to have some of both around for this project and I thought I'd figure out which one I like the best. I used the Klean-Strip for table top and the Citristrip for the legs.


Klean-Strip is like MAJOR caustic. Use it only outside or in a very ventilated space. Keep kids and pets away, and definitely wear gloves. If you get any of the gel on you, you will know in about five seconds. Ouch! 

So you're probably saying, "Jenny! Why would you use this product!?" And I'd say to you "Because I got stuff to DO!" This product works fast. In about 10 minutes, I scraped off the first few layers of paint. If I had waited another 10 minutes, it would have all bubbled completely and been ready to easily scrape up. I did end up putting on another quick layer of the gel and within 10 minutes that second layer was done. I should also mention that I don't usually use a paint brush to apply the stripper, like the instructions suggest. Mostly because I don't want to clean up a brush when I can use a putty knife just as easily (just like frosting a cake!), but also because the paint brush makes it harder to get a consistently thick gel coat. You're shooting for about 1/8-1/4" of stripper covering everything. If you're stingy with the gel, you'll be spending all sorts of time getting that old paint off.


Here's what the old paint should look like when it's ready to scrape. Klean-Strip recommends scraping the old paint into a stainless steel bowl, letting the chemicals evaporate outside and then discarding the dried paint, which is what I did.


So, all in all, after 20-25 minutes of work using the Klean-Strip, the table top was down to raw wood. Not bad!


For the legs, I pulled out my Citristrip, which is not at all smelly (it actually smells like oranges a little bit), and can be used inside. I got some of this on my skin too accidentally and I didn't even know! It makes me wonder how this stuff actually stripped off layer after layer of old paint, be it did! And it did it well!


So, the biggest bummer about Citristrip is it takes a while longer to bubble up the old paint. It took me about an hour and a half of waiting to get about 90% of the paint to release. And I went back and did some spot stripping to clean up some of the old paint that didn't come up the first layer. I think the legs took about two hours, when all was said and done. 


If you're doing this right, there should be zero amount of intense scraping. Wait until the old paint is super soft and bubbly, and they it just falls off. It's pretty crazy that in just a couple hours of easy work (most of that time was spent waiting), decades of paint jobs can be removed!

As far as a verdict goes between the two stripping gels, I think I'll probably stick with Citrastrip in the future. It did its job really well and it's easy to just do something else while you're waiting the extra time. I figure if I don't have the wiggle room in my schedule to wait an extra hour so I can avoid using super-toxic chemicals, there might be some bigger issues here. :)


Now, as far as painting goes, I am completely converted to oil-based paints. Latex is for walls. Oil is for furniture and floors. If you ask for Porch and Floor paint (which is usually oil-based), or Door and Trim paint (which is usually a water-based alkyd), you can get any color you want mixed. I actually had my local hardware store mix a Home Depot color (update: the color is "Citronette" from the Home Decorators Collection by BEHR) in Benjamin Moore paints, which is the opposite of what I usually do! ha!  :)


I used a two-inch brush to apply the paint. I don't like using foam rollers usually for oil-based paints, but I think that might be a personal preference? The texture of oil-based paints just works really well with a brush. Basically, and I'm sure I've said this before, it's just like putting on nail polish. It's like you're placing the paint. Once it's put on, don't mess with it. The brush marks will smooth out on their own. And if after the paint has fully dried (in about 24 hours) there are a couple of imperfections, you can sand or touch them up at that point.


You can see here above that I work in sections. Each dip-and-one-side-wipe makes a roughly 4x8" rectangle. If you just slightly overlap each rectangle, all the while resisting the urge to go back and touch up parts, and you'll have a perfectly lacquered piece of furniture on your hands 24 hours later. Seriously, it's like magic.


I love a punch of bright chartreuse in almost any room. It's definitely one of my favorite colors.


Ooh, also, on a whim I hung the Magnolia mirror that I painted with chalkboard paint on the little stair landing. I think I love it. It helps balance out the heaviness of the gallery wall a bit. Plus, the girls love it for fashion show purposes, which happen around here more often than I care to admit.